How to create a Next.js project with TypeScript, Jest, React Testing Library and Test Renderer

First, create a TypeScript project with create-next-app using the --ts or --typescript flag like so:
yarn create next-app --typescript
or
npx create-next-app --ts
Add required libraries:
yarn add -D jest @types/jest react-test-renderer @types/react-test-renderer @testing-library/jest-dom @testing-library/react babel-jest identity-obj-proxy
or
npm install -D jest @types/jest react-test-renderer @types/react-test-renderer @testing-library/jest-dom @testing-library/react babel-jest identity-obj-proxy
To transform common styles, you need to write a custom transformer. Create a cssTransform.js file in project root with the following content:
module.exports = {
  process() {
    return 'module.exports = "";';
  },
  getCacheKey() {
    return "cssTransform";
  },
};
This transformer will return an empty string instead of any common css styles file import (.css).
Next, you need to set the jest configuration. To do this, create jest.config.js file in project root with the following content:
module.exports = {
  collectCoverage: true,
  coverageDirectory: "coverage",
  collectCoverageFrom: [
    "**/*.{ts,tsx}",
    "!**/*.d.ts",
    "!**/node_modules/**",
  ],
  testEnvironment: "jsdom",
  setupFilesAfterEnv: ["<rootDir>/setupTests.ts"],
  testPathIgnorePatterns: ["/node_modules/", "/.next/"],
  transform: {
    "^.+\\.(ts|tsx)$": "<rootDir>/node_modules/babel-jest",
    "^.+\\.css$": "<rootDir>/cssTransform.js",
  },
  transformIgnorePatterns: ["/node_modules/"],
  moduleNameMapper: {
    "^.+\\.module\\.(css)$": "identity-obj-proxy",
  },
};
According to the config, jest will collect the code coverage and store it in the coverage folder. Сode coverage will not be collected for node_modules folder and .d.ts files. The jsdom environment will be used for testing. Before starting the tests, commands from a setupTests.ts file will be executed. babel-jest will be used for .ts and .tsx files transformation. identity-obj-proxy will be used for CSS modules transformation (files ending with .module.css). All your className lookups on the styles object will be returned as-is (e.g., styles.foobar === 'foobar'). Our custom transformer cssTransform.js will be used to transform common styles (files ending with .css).
To use babel-jest, you need to set it's configuration. Create a .babelrc file in project root with the following content:
{
  "presets": ["next/babel"]
}
Next, add custom jest matchers from jest-dom before each test run. To do this, create thesetupTests.ts file in project root with the following content:
import '@testing-library/jest-dom/extend-expect';
Add following scripts to package.json:
"scripts": {
  "test": "jest",
},
Let's test configuration. Create __tests__ folder in project root, then create snapshot.tsx and testing-library.tsx files in __tests__ folder.
snapshot.tsx:
import renderer from "react-test-renderer";
import Index from "../pages/index";

it("renders homepage unchanged", () => {
  const tree = renderer.create(<Index />).toJSON();
  expect(tree).toMatchSnapshot();
});
testing-library.tsx:
import { render } from "@testing-library/react";
import Index from "../pages/index";

test("renders deploy link", () => {
  const { getByText } = render(<Index />);
  const linkElement = getByText(
    /Instantly deploy your Next\.js site to a public URL with Vercel\./
  );
  expect(linkElement).toBeInTheDocument();
});
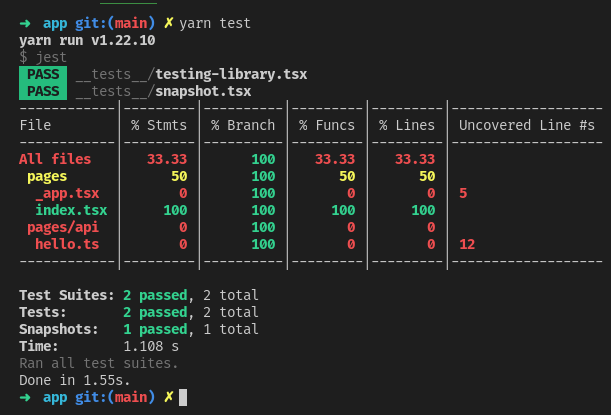
To start the tests run the following command:
yarn test
or
npm run test
Result: